Pages

Welcome!

This blog is for those of us girls (and guys) who love everything artsy and enjoy the challenge of discovering new and exciting ways of creating something wonderful. We do not discriminate against any artform but are willing to try them all and pass on our knowledge to you. In addition, we love to feature our ATA Girlz (and guys) so that those people who can't draw a straight line - but love unique and handmade items - can help support our wonderful friends. Visit often to discover what we're "playing" with next!
Showing posts with label dani fausek. Show all posts

Wednesday, March 26, 2014

Eggsperiments don't always work!


Easter is right around the corner… yes folks – it’s that time of year when egg artists around the world (myself included) get put their glitter and glue and work feverishly to produce fancy eggs for everyone to enjoy.  For me – that not only includes putting together the IEAG (International Egg Art Guild) quarterly magazine, but working to increase my stock of saleable eggs.

I have a problem though, and it maybe one that every artist shares (comment if you agree). I get bored!  I like to design and experiment, not do the same thing over and over.  That means I haven’t settled into one style of egg art –but play around with everything.  My show tables are definitely an eclectic mix of it all.  For that matter – so are the stores!

Lately, I experimented with a new kind of colored egg kit that I found at the local Michael’s store. It had beautiful 14K gold glazed eggs in amazing colors.  So – I thought – why not.  Bought the kit and ran home to try it.
 
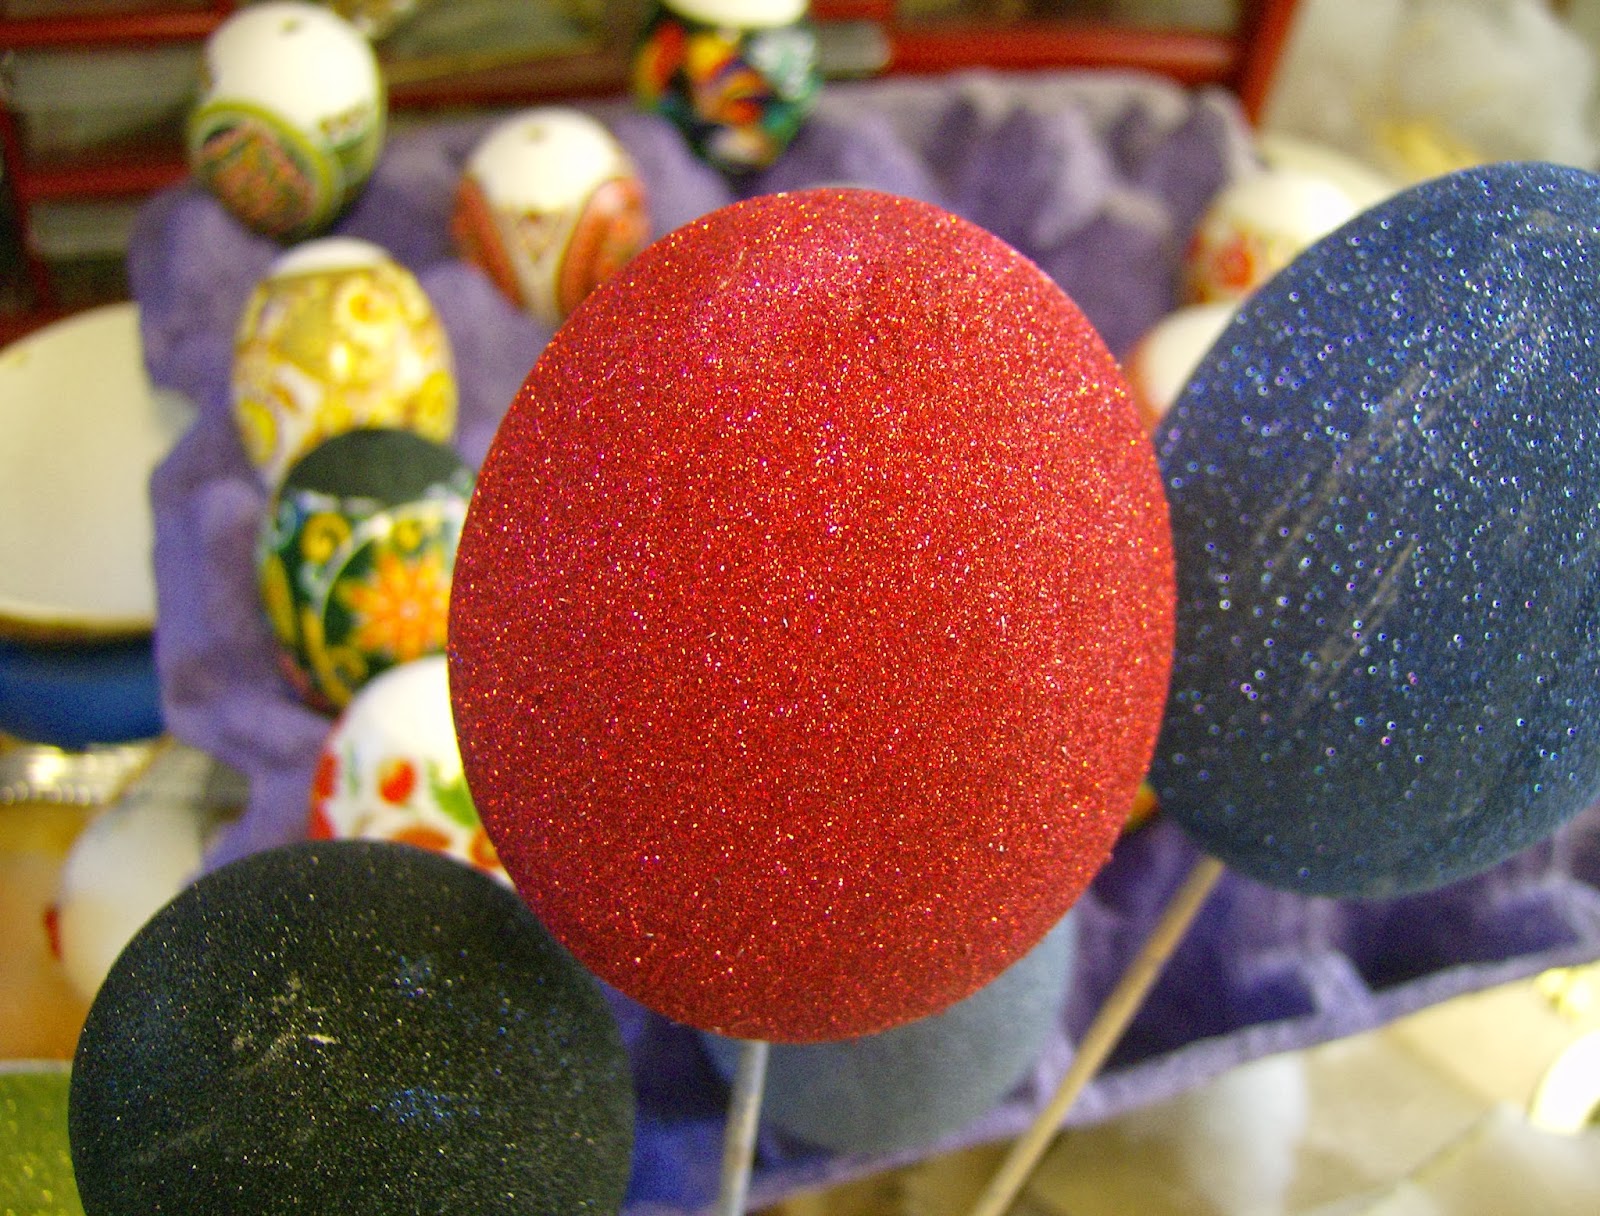
Now the kit showed gorgeous eggs in solid colors of gold, green, violet, pink and blue, all with the incredible gold sheen.  I followed the directions exactly.  Did I get what was advertised?  Take a look……LOL.

 The solid color just would not apply evenly to the egg shell, so I ended up being creative and did a kind of sponge painting on them.  While pretty, not eggsactly what I anticipated.  

Does that mean I stopped… nope. I broke out the washi paper, inks and egg wraps and went to work…. After all – I have a table and store to fill.  


Anyone in the Rockford Illinois area can come see me this weekend (March 29 & 30, 2014) at the Rockford Egg Show and Sale.  Held in the Midway Village  & Museum (6799 Guilford, Rockford, IL), the show features some of the best Midwest egg artists displaying and selling their eggs, as well as suppliers selling miniatures and art supplies.  A great place to spend an afternoon, the show is open from 10am to 4pm on Saturday and Sunday.  Stop in and say hello.  

 For directions – here is the link to the museum ( http://www.midwayvillage.com/wordpress/event-registration/?ee=6 )

Tell me what you are creating special for the holiday season!

Thursday, October 10, 2013

Glitter Glitter Everywhere


All glitter is not created equal.  That’s what I have discovered lately.  In the course of creating my Christmas Holiday ornaments for this year (yes folks, I did say Christmas!), 
Winter Egg Ornament


I have been glittering my little heart out.  After all – what’s not to love about a glittering egg ornament twirling on your holiday tree – right?

White Glitter with Gold Accents
There is clear glitter, big glitter, colored glitter and glue-glitter. In addition, there is big, regular, small, fine, ultra fine and ultra ultra fine.  There is white glitter that is enhanced with slight color enhancements so that even though it goes on and looks white or clear, it sparkles with gold, green and blue accents. 


Then there’s also vintage glass glitter that is larger, hard to find and available in only a few colors like copper and aqua. (I got mine from Martha Stewart YEARS ago!)  And the colors - - ARGGGHHHHH !     How do I choose?
Velvet Glitter on Eggs

During my last trip to the Eastern Ohio Egg Art Show I picked up some new “velvet” glitter. OMG – I am in love.  It is nothing like my regular old glitter and creates this beautiful velvet look to my egg ornaments. 
  
But can I simply ignore my old standbys while I use this special glitter and the glue needed for that velvety look – or do I mix it up and use both?  I’m SOOOO confused.


Colored Velvet Glitter
I have learned a trick however that allows you to glitter something and not have the glitter fall off.  After gluing and glittering your item, let it dry completely, brush off any extra then apply a second layer of glue or some Mod Podge over the entire item. It will seal your glitter in and keep it from attaching itself to everything and everyone in the area.  Try it and let me know what you think.


In the meantime – I’m going back to my craft room to make more glittering creations.  Have a craft sale coming up and I think these sparkly beauties will be a hit!

Remember - there's only 76 days left til Christmas!

Dani

Wednesday, October 31, 2012

Wordless Wednesday: Introducing Homer

We've been so busy creating interesting things to share with everyone, we haven't really taken any time to introduce ourselves to you.  I'd like to start by introducing the most interesting member of our family, Homer.

Homer is a Havanese and, in the 2 years he's been a part of our family, he's entrenched himself in our lives and hearts.  Given to me by a former boss who could no longer keep him, he joined us at about 8 months old.

Technically a companion for our father (who really didn't want a companion!), he is probably the smartest four-legged person our family has ever had.  The breed is known for being gentle and, although I scoffed at the idea, not barking.

 It took 2 months before we heard a sound out of him.


I think he realized that "grandpa" couldn't hear him (the doorbell, the phone, someone knocking, etc.) and so he took to standing at the base of whatever chair Dad was sitting in and "woofing" up at him.  When that didn't work - standing on his hind legs and putting his front feet on Dad's legs along with the "woof" did. 

He is an absolute joy and has become Dad's constant companion.  When we take Homer on "vacation" or to Doggy Daycare, there's always a phone call that begins with Dad singing "Oh where oh where has my Homer gone... Bring back, bring back oh bring back my Homer to meeeeeee!"

The pictures here were taken one day when "grandpa" and "daddy" were heading to the store together, leaving me "mom" alone with our little guy.


Picture one - -- ok Mom - where did they go and why didn't they take me!


 Picture two - -  you said they'd be right back -- where are they?

Friday, September 7, 2012

Not Just for Breakfast Anymore... Egg Art

I'd like to take a little bit of your time to introduce you to one of my favorite art forms - Egg Art.  Not just your typical egg dyeing that you normally do around the spring holidays - Egg Art encompasses many different styles.  Egg decorating has been around for centuries, and many of those early techniques and traditions are continued today by artists around the world. Just about anything you can imagine can be done to an egg.

The International Egg Art Guild (IEAG) website (http://www.eggartguild.org/) is a great place to start learning about the different forms of Egg Art.  More than twenty-five years ago Kit Stansbury put the wheels in motion to form a society where artists could discuss, share and exchange ideas, and promote egg decorating as an art form.  Now, with membership in the guild worldwide, they have created a flourishing Masters Program to help anyone wishing to improve their artistry and technique. The artform is flourishing, and nowhere is this better experienced than at an Egg Art Show.

All around the world, egg artists and suppliers gather at a show to hold classes and display their individual art to any who wish to see.  The IEAG website has a list of the shows held each year.  There is no better place to experience all the various types of Egg Art than at one of these shows.  Suppliers are available as well, providing a hands-on opportunity for visitors to purchase kits, miniatures, eggs and tools.  Many Egg Artists also display and sell their work at local art shows and shops.  

With the invention of the internet - Eggs have gone viral.  A search on the words Egg Art on Google recently pulled up over 72,000 hits.  Searching on the words Pysanky (a wax resist method), Carl Fabergè, Ostridge Eggs, Emu Eggs, Rhea Eggs, Carved eggs, etc will bring up lists of suppliers, artists from around the world, and general information.  One such artist is Lorrie Popow, a Master Egg Artist who has recently placed her training sessions on Youtube for everyone to enjoy. 
 Lorrie is definitely one of our finest ATA Girls, and we are proud to be able to place the link to her videos on our sight for everyone to experience.

Friday, July 27, 2012

Handmade Butler's Tray: Summer Collage Project

Summer in Wisconsin - and just about anywhere for that matter - means family and friends getting together for BBQ'd delicacies while enjoying the warm summer breezes with a cool drink.  This season those evenings may be few and far between with temps the highest they've been in 90 years, however they do present a unique chance to work some special magic and get all crafty!

At least - that's what I told myself when I decided that I needed a tray to serve drinks, food or just to carry things from one place to another.  Often called a "butler's tray" these wonders of convenience were, at one time,  made of silver and highly polished.  There's no way I can afford either the money to buy one of these or the time to polish it, however that didn't stop my wanting one.  So, I did some research, and some crafty designing and here's what I came up with.

You will need
Picture frame, 11-inch by 14-inch, 1-2 inches deep with glass
1/8" piece of wood - cut to fit the frame
Paint to match the frame
Screwdriver
2 handles
Screws
Cordless drill
Patterned Scrapbook paper
Scissors
Glue stick

The first step is to take the frame apart.  Set aside the back and glass - you'll need them later.  Put the handles against the frame so that they may be fastened at least halfway up the outside side of the frame. They should be easy to use - so you'll have to test them (I used painters tape to hold them in place until I was ready.) Predrill holes for the screws to keept the frame from splitting. Make sure the screws are only as long as the frame wood is wide. For example, if the frame wood is 1/2 inch then the screws should only be 1/2 inch long. Screw the handles in place - but make sure they don't go all the way through the frame.

Lay the paper or cardboard backing that you removed from the frame on a table.  Place your paper on the backing and cut it to size.  Get creative, no one said you just had to use 1 piece of paper! Glue it into place.   While the glue is drying, paint your piece of wood. I painted mine the same color as the frame - but you can use your imagination (or any leftover paint you may have).  Allow it to dry completely before assembling your tray.

Turn the tray upside down and place the glass in first, then the scrapbook backing, then finally the piece of wood.  Secure it all by placing screws or nails (at a slight angle) into the frame making sure they overlap the back to hold it in place.  Test it before using with anything heavy as you may need to reinforce it before using it to serve heavy items. 

There you go - you're very own serving tray.  Now if I just had the butler to go with it!

~ Dani

Tuesday, July 17, 2012

Bind Your Life: Homemade Scrapbook /Journal Covers


I spent some time wandering the "Inspire Me Monday" blog hop and can honestly say I was definitely inspired by the sheer scope of the creative talent that is out there.  All I can say is WOW!   From cooking to freehand design elements - how in the world did all these wonderful people connect before the internet!  And what incredible ideas are floating out there to latch on to!  Which brings me to my "inspiration" of the week!

Once more, my other half and I traveled to the north woods of Wisconsin last weekend.  It's great now that he's retired that he can do the driving after I've worked a full day.  Gives me the chance to do some closed-eye creative thinking.  All weekend long - while hanging drywall and laying subfloors (we'll talk about that project sometime later) - I was thinking about what I could do to creatively capture this huge long-term project.  I've already got a "building book" that holds the plans, color squares, ideas, measurements, and photos - but I wanted something more.  Something that tells the "story" more than the details.

Not long ago I wrote an article for an on-line help site on creating a travel journal.  How you take a blank notebook and as you travel you make note about what you've done, seen, experienced. Complete with some sketches (if you are artistically inclined) and special small mementos, this then because your trip "story".  Similar to what the old Banana Republic catalogs featured (for those old enough to remember those really cool catalogs).  Could I create something like this for the happenings we experience at our home away from home?

I'm thinking to include not just the humorous stories that happen (like holding a piece of drywall on my head as Leo screws it into the ceiling) but written expressions of amazement at the sight of a triple rainbow arching over the house, or the doe stopping in the center of the orchard to look in my direction and standing there, perfectly still, for all of 5 minutes before taking off down the forest path.


Not content with keeping my artistic slant inside the pages of this journal, I also want to capture it on the outside as well.  The question then becomes how?  I could create a free-form beaded cover similar to this one found at www.why-not-art.com.  


Or I could create a felted cover like this one created by Barbara Potoczny  (http://www.barbarapotoczny.com/classes-detail.php?ID=6).  
 
 And if I want to personalize the outside, am I doing an injustice to the book itself by using plain old paper or should I create my own book by binding together different types, colors, styles and sizes of paper and thereby make something uniquely mine.  And if I make one for me - should this be my gifts for the holidays for my more artistic friends and family members.

I'm giving myself a headache!  So much inspiration - so little time!
 
~ Dani

Books by our Bloggers

ATA Girls Blog Hop: All People Creative Welcome!